LUUM.IO
AMATIS BORDER ROUTER (AMBR) - INSTALL GUIDE#
Introduction#
About This Guide#
This guide provides instructions for installing and maintaining the Amatis Controls Border Router (AMBR), the core of the Amatis wireless lighting control system. In addition to the step-by-step installation process, this guide provides instructions on how to connect and login to the AMBR, as well as some basic troubleshooting steps.
Product Overview#
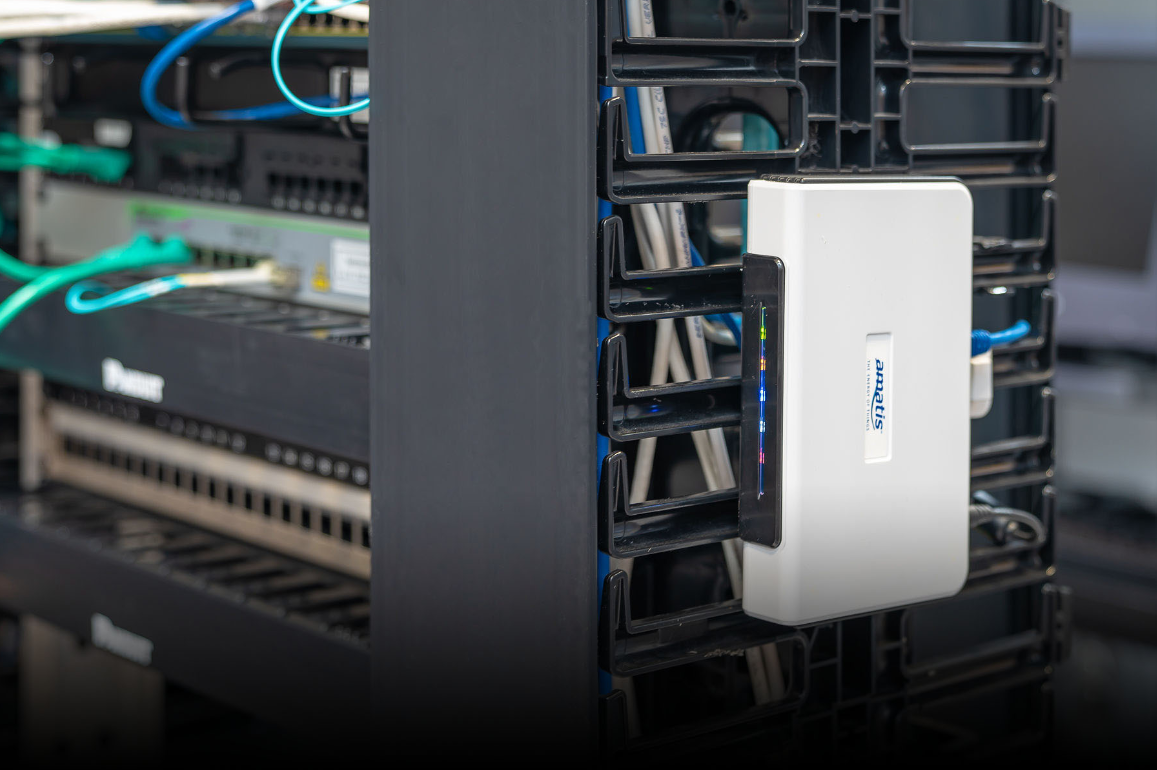
The Amatis Border Router (AMBR) is a wireless gateway device used to connect the wireless mesh network to the cloud. Once connected, AMBR assigns programming tasks to devices during commissioning, and allows for remote support and data collection to be viewed from a phone app or web browser.
- Manages the creation of Amatis 6LoWireless mesh networks.
- AMBR connects all wireless devices to the cloud using secure IPV6 6LoWireless, uploading real-time data from your site to the Amatis config app.
- Enables remote configuration.
- When connected to the Internet, the Amatis config app easily commissions the AMBR and all devices on the mesh network.
Installation#
Parts List#
Before getting started with the installation process, it's important to make sure all the necessary components are included. Here's what should be found inside the box:
- (1) Amatis Border Router (AMBR)
- (1) 24V Power Supply
- (1) Ethernet Cable
- (1) Wall Mounting Bracket
- (3) Bracket Screws
Placement#
Follow these guidelines when deciding on where to install the AMBR:
- The AMBR should not be installed in a metal enclosure, or behind other signal limiting barriers such as metal or thick concrete walls.
- The AMBR should be installed in a location that is central to the devices that it will be communicating with.
- Sites with more than 100 devices will need to have multiple AMBRs, and the AMBRs will need to be distributed amongst the devices.
Multi-AMBR Sites
An AMBR can support a maximum of 100 wireless devices. If the site has multiple AMBRs, do not centrally locate any of the AMBRs. Please refer to the Multi-AMBR Config Guide for information on configuring multiple AMBRs on a single site.
Initial Setup#
Necessary Parts#
Review the following list to ensure all necessary parts are available:
- Ethernet cable ran to the AMBR location.
- Electrical outlet near the AMBR location.
PoE
It is possible to power the AMBR using PoE with an off the shelf 24V PoE splitter (not included) located at the AMBR.
Power Up#
Perform the following steps to power up the Amatis Border Router:
- Connect the AMBR to the ethernet cable.
- Plug in the AMBR power supply into the wall outlet, and connect it to the back of the AMBR.
- Wait 1-2 minutes for the AMBR start-up light sequence to successfully complete.
IT Requirements
Provide the network firewall requirements to your site's IT personnel to ensure AMBR is able to establish an Internet connection.
Logging In#
Perform the following steps to login to the device:
-
Open a web browser on a computer that is connected to the same network as the device. In the address bar of the web browser, type in “lmbr-0” followed by the first three digits of the device ID (found on the device), followed by “.local”. This should bring up the login page for the device. (Example: for device ID: “ABC00F” type “https://lmbr-0abc.local”).
Note
It's likely that you'll get a message that your connection is not private. This is expected and ok. Click on advanced and proceed to the IP.
Note
The device ID can be found on the device’s packaging or the device itself.
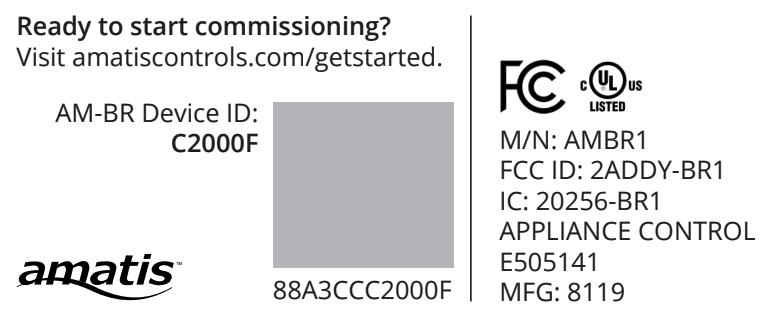
Alternatively, use a network scanning tool to locate the .local or IP address.
-
Login to the AMBR using the AMBR's username and password.

-
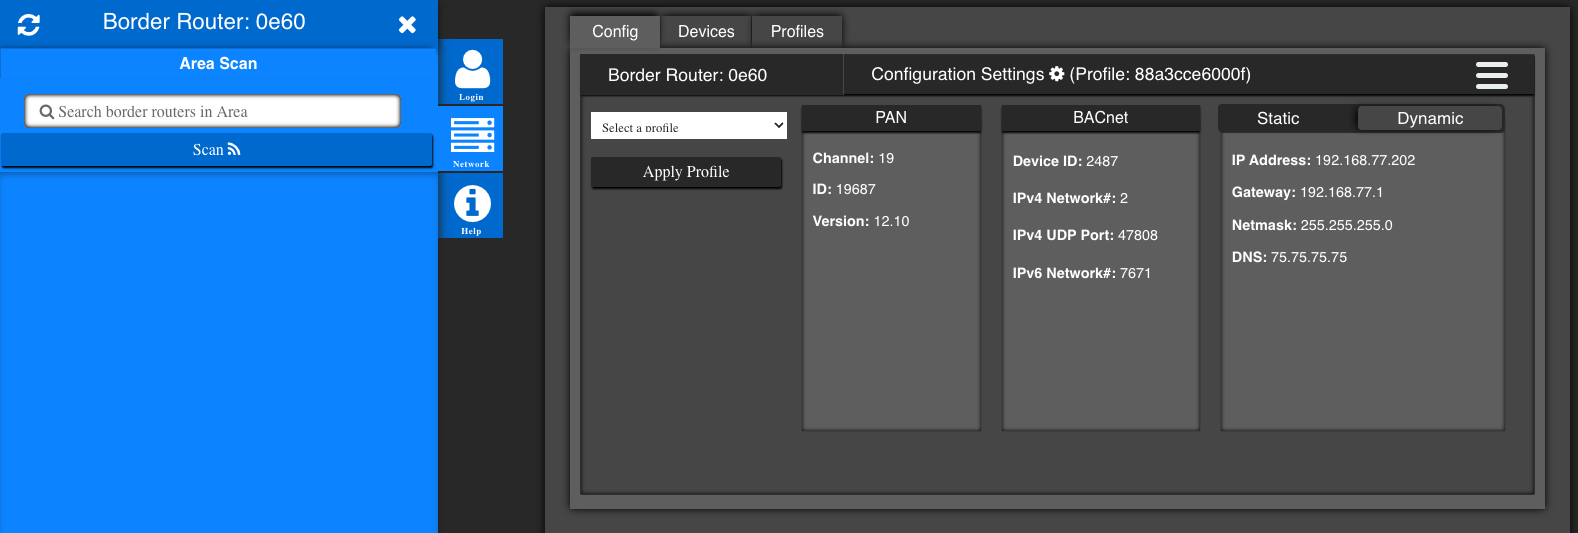
Once logged in, the home page will be displayed.
Updating Firmware#
Perform the following steps to update the device's firmware:
-
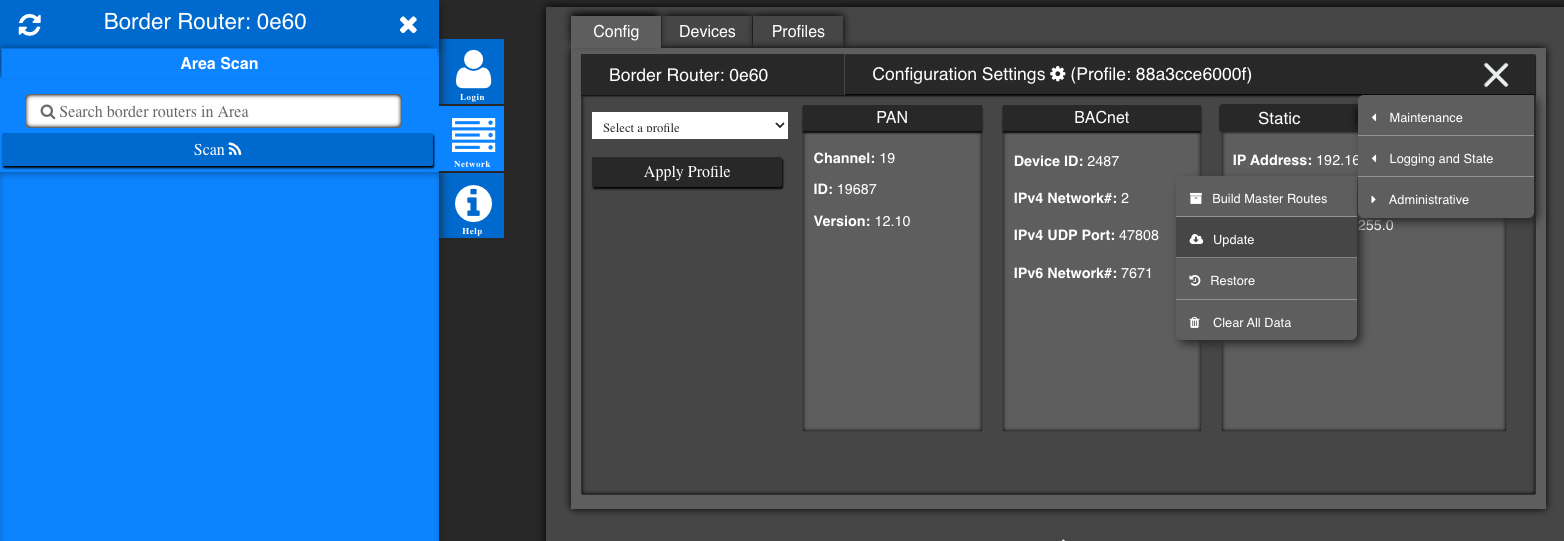
Once logged into the AMBR, select the menu button on the top right of the home screen, select "Administrative", then select "Update".
-
This will bring up the update page. Select "Automatically update with newest signed bundle from cloud", then select "Submit".
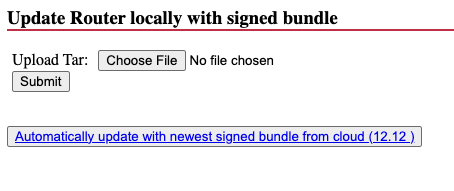
Custom Firmware
If firmware has been provided by the Amatis team, instead select "Choose File", and upload the provided firmware. Then select "Submit".
-
Wait for the update page to confirm a successful update. This may take up to 10 minutes. After a successful update, the AMBR will reboot. The update is now complete.
Related Information#
Network Firewall Requirements#
Provide these instructions to the site's IT personnel to ensure AMBR is able to establish an internet connection:
| Network Settings | ||||||
|---|---|---|---|---|---|---|
| PRIORITY | TARGET | PORT | PROTOCOL | SERVICE | DIRECTION | REASON |
| 5 | mqtt.amatiscontrols.com | 443 | tcp | https | outbound | Configuration, control, system monitoring |
| 5 | vpn.amatiscontrols.com | 1195 | udp | vpn | outbound | Maintenance, configuration |
| 3 | api.amatiscontrols.com | 443 | tcp | https | outbound | Integrate cloud resources with local configuration |
| 3 | static.amatiscontrols.com | 443 | tcp | https | outbound | Allow firmware downloads from Amatis firmware server |
| 3 | ntp-b.nist.gov (or your preferred NTP server) | 123 | udp | ntp | outbound | Network Time Protocol for time synchronization |
Privacy
Amatis does not collect ot store personal information.
Integrations#
The Amatis control system can integrate with Building Management Systems using a BACnet/IP connection over ethernet/RJ45 to the AMBR(s) on site.
Basic Troubleshooting#
Perform the following steps for basic troubleshooting of the device:
- Verify the device is operating normally using the LED Troubleshooting Matrix below.
- If the blue LED is off, check the network cables and ensure the device is not being blocked by any IT rules.
- If the red LED is off, the device is not getting adequate power. Check the power supply.
- Power cycle the device by disconnecting the power supply, and reconnecting it 30 seconds later.
LED Indicator Troubleshooting#
Use the following table to troubleshoot specific issues with the device based on the LED indicators:
| LED Troubleshooting Matrix | |||
|---|---|---|---|
| LED Color | SOLID | FLASHING | OFF |
| Green | AMBR startup successful | AMBR is starting up | AMBR startup error |
| Orange | Offline data logging successful | Offline data logging error | |
| Blue | Data logging enabled successfully | Data logging and configuration enabled successfully | Internet connection error |
| White | 6loWPAN success | Normal Operation | |
| Red | Power connection good | No power connection |
Normal Operation
BOLD description indicates normal operation.
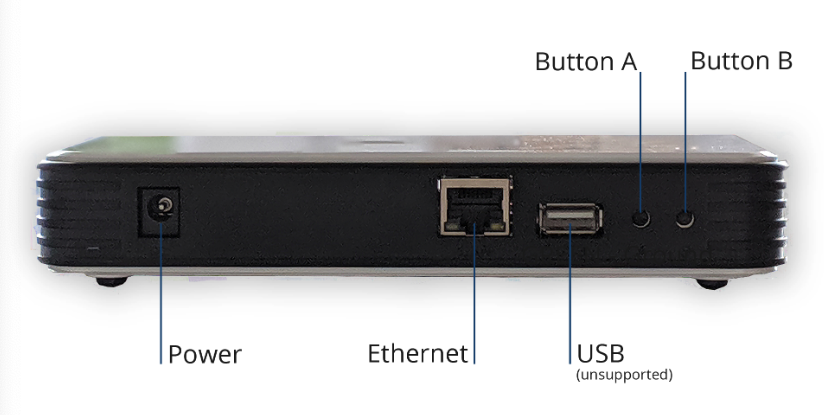
Button Operation#
On the backside of the AMBR, there are 2 buttons on the right of the device - Button A and Button B.
Button A
This button should only be used for a hard reset. Perform the following steps to hard reset the device:
- Unplug the device.
- While the device is unplugged, hold the A button for 10 seconds.
- Release the A button and plug the device back in.
Basic Troubleshooting
Ensure that the basic troubleshooting steps were followed before attempting a hard reset.
Button B
Perform the following steps to use button B:
- Enter config mode:
- Press and hold the B button for 3 seconds. After three seconds, the White LED will begin to blink. Release the B button.
-
At this point the following options are available, by pressing and releasing the B button to cycle through the choices:
- DHCP: Press and release the B button once to select the DHCP option. The Blue LED will display solid to indicate this choice.
- STATIC IP: Press and release the B button a second time to select the Static IP option. The Orange LED will display solid to indicate this choice. Static values will be set to the following:
- IP address: 192.168.5.241
- Subnet: 255.255.255.0
- IP address: 192.168.5.241
- EXIT WITH NO CANGES: Press and release the B button a third time to select the “Exit Config with out changes” options. The Green LED will display solid to indicate this choice.
- FACTORY RESET: Press and release the B button a fourth time to select the factory reset option. The Blue, Yellow, and Green LEDs will all display solid to indicate this choice. This will delete any user created profiles, as well as the password if it was changed from the default. Please note that this also deletes the profile that is shipped with the unit. This is the profile named for the Device ID of the router.
Warning
You will also have to factory reset your devices if your site is commissioned. If you have sensors in your site, please email support@amatiscontrols.com before conducting the factory reset.
-
Apply selection:
- For DHCP, Static, or Exit with No Changes: press and hold the B button for 3 seconds to commit to the choice.
- For a Factory Reset: press and hold the B button for 15 seconds. All LEDs will blink to indicate that you are about to reset the unit. Then press and hold the B button for another 15 seconds to confirm that is what you want to do. The AMBR will then reboot.
Note
If you are on option 4 and press and release the B button without holding it for the 15 seconds, the unit will cycle back to choice 1, as indicated by the LEDs.
Technical Support#
If you experience any issues during installation or operation of this product, please contact our technical support team for assistance. Our technical support team is available via email at support@amatiscontrols.com. Please provide a detailed description of the issue you are experiencing, including any error messages or other relevant information.
Warranty#
All Amatis LED lighting products and controls come with a 5-year parts warranty, as well as labor per product up to a maximum of 50% of the material price for parts being replaced*. All parts are UL certified. Lamps are DLC certified, therefore eligible for utility incentives. We warrant that our products will be free from defects in material and workmanship for a 5-year period from the date of purchase. Defective products under warranty will be replaced with an equal or higher quality product.
Internet Connection
The Amatis Border Router (AMBR) connected to your affected device must have remained connected to the Amatis cloud via the Internet or cellular connection from the start of site commissioning to date of return request. Non-connected systems are eligible for a 2-year limited warranty (730 days) from shipment date, with the same remaining criteria.
Contacts#
Luum.io Headquarters
625 Kenmoor Ave STE 350
PMB 51933
Grand Rapids, MI. 49546
Phone: +1 (313) 314-3617
Document Feedback#
While we have taken great care to ensure the accuracy and completeness of this document, we welcome your feedback and suggestions to further improve it. If you notice any errors or omissions or feel that a topic could benefit from further explanation, please let us know by emailing your feedback to support@amatiscontrols.io. Your input is valuable to us and will help us enhance the quality and usefulness of our documentation.
Disclaimer#
All rights, title, and interest in and to this manual, including without limitation all copyright, trademark, patent, trade secret, and other proprietary rights, belong solely and exclusively to Luum.io and/or its licensors. This manual is provided solely for the purpose of assisting in the installation and operation of the device, and no license or other rights are granted or implied hereby. No part of this manual may be reproduced, distributed, or transmitted in any form or by any means, including photocopying, recording, or other electronic or mechanical methods, without the prior written permission of Luum.io. The contents of this manual are subject to change without notice. The information contained herein is provided on an 'as is' basis and is for informational purposes only. Luum.io makes no warranty, express or implied, as to the accuracy, completeness, or usefulness of this information, nor does it assume any legal liability or responsibility for the consequences of any errors or omissions therein. The names of actual companies and products mentioned herein may be the trademarks of their respective owners.